Saturday, December 31, 2011

Project 1: Self-Critique

Firstly, I am not completely satisfied with my model of my laptop.
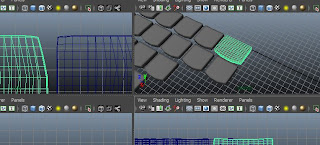
There is a part (face) of the laptop with was somehow distorted after the smooth mesh was applied. & I wasn't able to undo it.
I didn't want to use bevel as the smooth mesh looks better, besides the fact of one distorted face.

The most successful part of my model, I feel, is the keyboard. It was easy as it consisted of mostly duplicating then resizing to form the different keys. At this point in time, Boolean difference worked fine. No problems at all.
But when it came to trying to cut the face into the main body of the laptop, I wasn't able to use Boolean Difference because my objects would disappear. Instead, i had to extrude faces to create a depression in the object.
As you can see from the image below, the distorted face near the trackpad.


This is the front view. It looks different because of the angle at which i took of my actual laptop.
I applied a reflective material to the screen & lens of the laptop so at some angles, it looks pretty weird. The frame around the screen has small bumps, in the shape of a square & rectangle with rounded ends. These I achieved by cutting lines & extruding faces then applying Smooth Mesh to it.


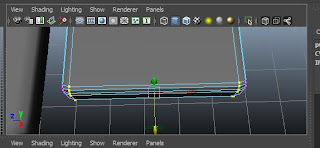
From the top view, you can see very clearly i actually failed to include the on/off button. I wasn't able to cut faces or insert lines or do Boolean. As mentioned earlier, Boolean causes the selected objects to disappear. Yet strangely, i was able to do Boolean Difference for the track pad.
Comparing these images side by side, the difference between them is little aside from the fact that my model is missing the on/off button.


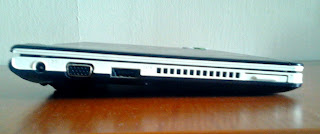
Here's the side views of my laptop.
I am actually happy about the USB ports & such. Although I'm not sure if I did them the right way. Again, Boolean Difference didn't work. So instead, I created lines using the Insert Edge Loop tool & extruded faces to create the holes. As well as the small bits & pieces that stick out in the middle of the USB ports.
Comparing my model to my actual laptop, the USB ports are quite similar on the surface. Though I am not that sure on the inside of the ports because the details very small & i even used a torch to shine into the holes to make sure i got the insides right.


In conclusion, the problems I encountered while modelling my laptop mostly applies to using the Boolean Difference function. Other problems are just that after creating the keyboard, I experienced extreme lag. Maya would hang occasionally & crash every time I try to open a new scene.
Apart from that, I was able to successfully create a model of my laptop (though the likeness is questionable).

Project 1: Progression


Saturday, December 3, 2011

Project 1: Research & Stuff

1. STORY
His heart was beating madly against his chest.He had been waiting all his life for a chance like this. He was going to win this rat race no matter what.
Mr.R drove at maximum speed, ignoring the dangerous curves and bends in the road. There were moments where he almost flew of the track, yet managed to avoid doing so with a bit of luck.
The obstacles that were in his way wasn't going to stop him. Like a rocket, he chionged through the course, knocking every obstacle out of his way. His opponents were left behind in the dust, faced with the destruction Mr.R caused - the track was blocked with a whole pile of debris.
As Mr.R was nearing the end of the track, his homebuilt mousetrap car was about to fall apart from all that damage taken when he raced through the obstacle course.
But he had worked too hard to give up now, so with one last boost. Mr.R crashed his car right past the finish line. He got out unscathed but his car was in ruins. There was no way it could be used in another race ever again.
With a heavy heart, he stepped up to claim his prize - a laptop.
"A laptop?" ...
When he got home, he turned on his laptop, discovering a world of online games and movies and more!And from that day on, the rat became a Hikikomori - staying at home all day long, facing his laptop.
THE END.

2. SHAPE
The object i've decided to model is my 13" Lenovo laptop.
To me, i feel that it will be pretty difficult (yet manageable in a way) for me to model because it has a bunch of USB ports with very fine details on the interior. There are little metallic strips & pieces, small holes here & there.
Plus, the individual keys on my keyboard. There are different shapes/sizes.
The surfaces on my laptop are all different as well.
The keyboard area is a seperate piece from the laptop itself, this piece is smooth, little or no texture there.
Then the surface surrounding the area of the keyboard has a rough texture, with fine horizontal lines covering the area.
As for the cover thingy, the texture is... oh god.
Some parts are rough, little of it is smooth. There is pattern on it.

But basically, my laptop would consist of mostly cubes.
I can adjust the shape/size of the cubes to form the basic shapes of my keyboard & its keys, as well as the main body of my laptop.
To create the different surfaces, dents, holes & such. I would be using tools such as the extrusion & bevel tools. Also, to create the holes, i could use Boolean>Difference, as i feel it would be easier for me.

3. DESIGN
Here's what my laptop looks like. Ignore the masking tape & the dinosaur sticker.


& here's umm... a wireframe sketch of my laptop.
Im not sure if it's done right though.


4. RESEARCH
I've tried googling for wireframe sketches of laptops, i found these images.


Other results were mostly of why/what are wireframes & their uses, plus a bunch of Iphone wireframe sketches.
Then i tried to search for a tutorial or something on youtube.
I found this.

It uses 3ds Max instead of Maya.
But i guess i can sort of learn about how to create basic components of my laptop from it. (screen, base, keyboard, trackpad. etc.)

Among the search results, i saw this.

I know it's not a laptop but the method used for creating the keys is somewhat similar, no? So i thought i might try using this as reference.

So after considering a bunch of options & thinking about what was taught...
I've decided to use the bevel tool to smooth edges of the laptop & the keys of the keyboard. Probably because i haven't actually gotten the hang of the whole topology thing. I might end up messing up everything instead. So i'll stick to what i know.
I'll be creating the keyboard as a seperate piece from the entire laptop.
As for parts like the laptop screen, the USB ports & such, i could try inserting extra lines by using the Insert Edge Loop Tool, then using the Extrude to push selected faces in.
Of course, the shapes of the USB ports are all different.
So i might try manipulating vertices to create the shape of the hole then extrude it. If that fails, i'll create the shape using polygons then Boolean>Difference.
Though from what i heard, Boolean messes things up. So i were to use the Smooth mesh thing, i might distort the entire model.
I DEFINITELY DON'T WANT THAT TO HAPPEN.
In previous lab exercises, i was able to successfully (besides one of my cardboard boxes) create the 3D models of different objects. But that was with the help of the step-by-step instructions given. So up till now, im able to use the various tools & techniques learnt to create simple 3D models.
But right now, im on my own.
So it would be better if i plan about how i should start modelling my chosen object. (Why, WHY DID I CHOOSE MY LAPTOP?)